

Prerequisites
Before you begin, you’ll need:- Urtentic Account: Sign up at urtentic.com
- API Credentials: Obtain your Client ID and API Secret from the integrations page in your dashboard
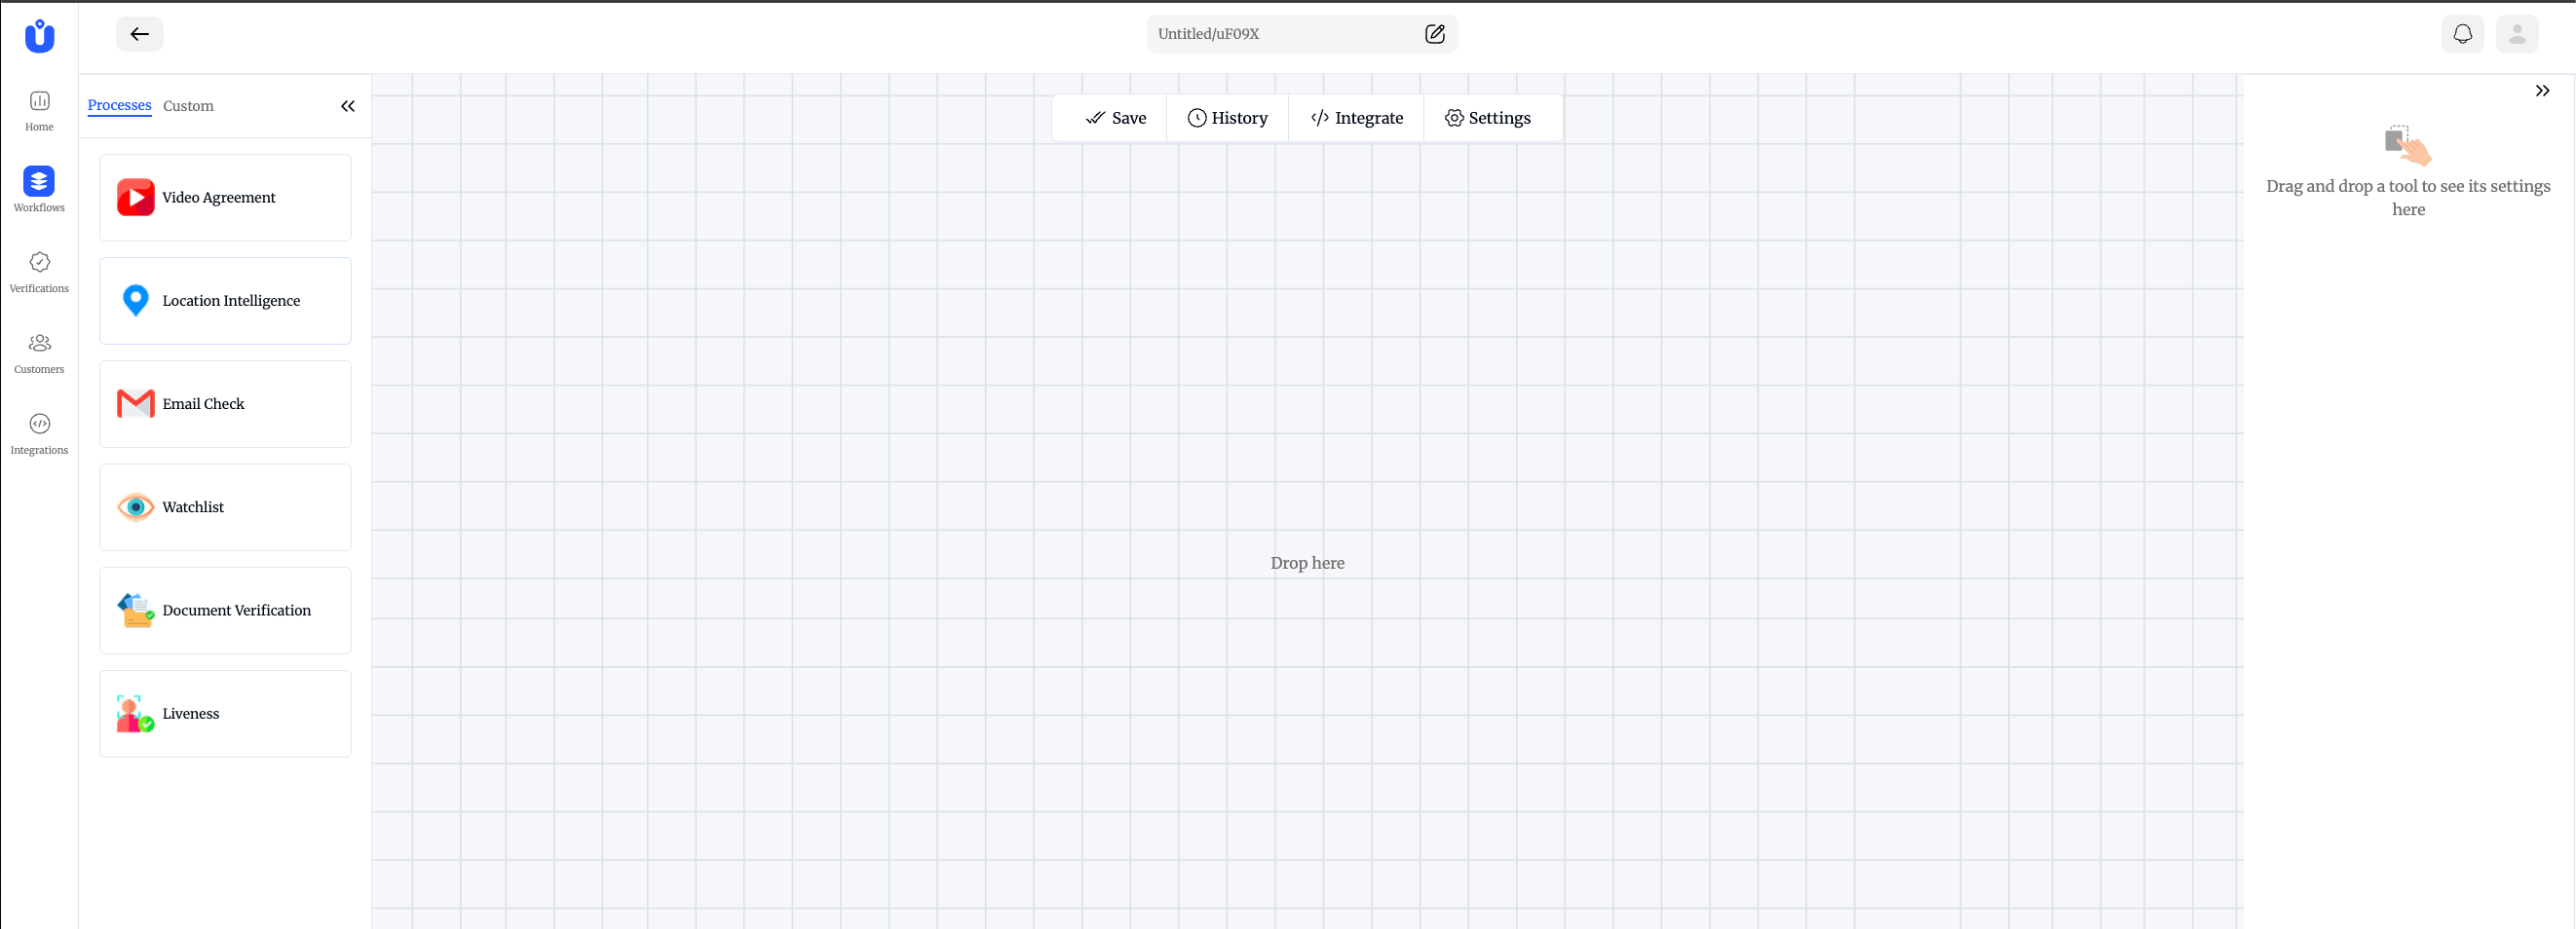
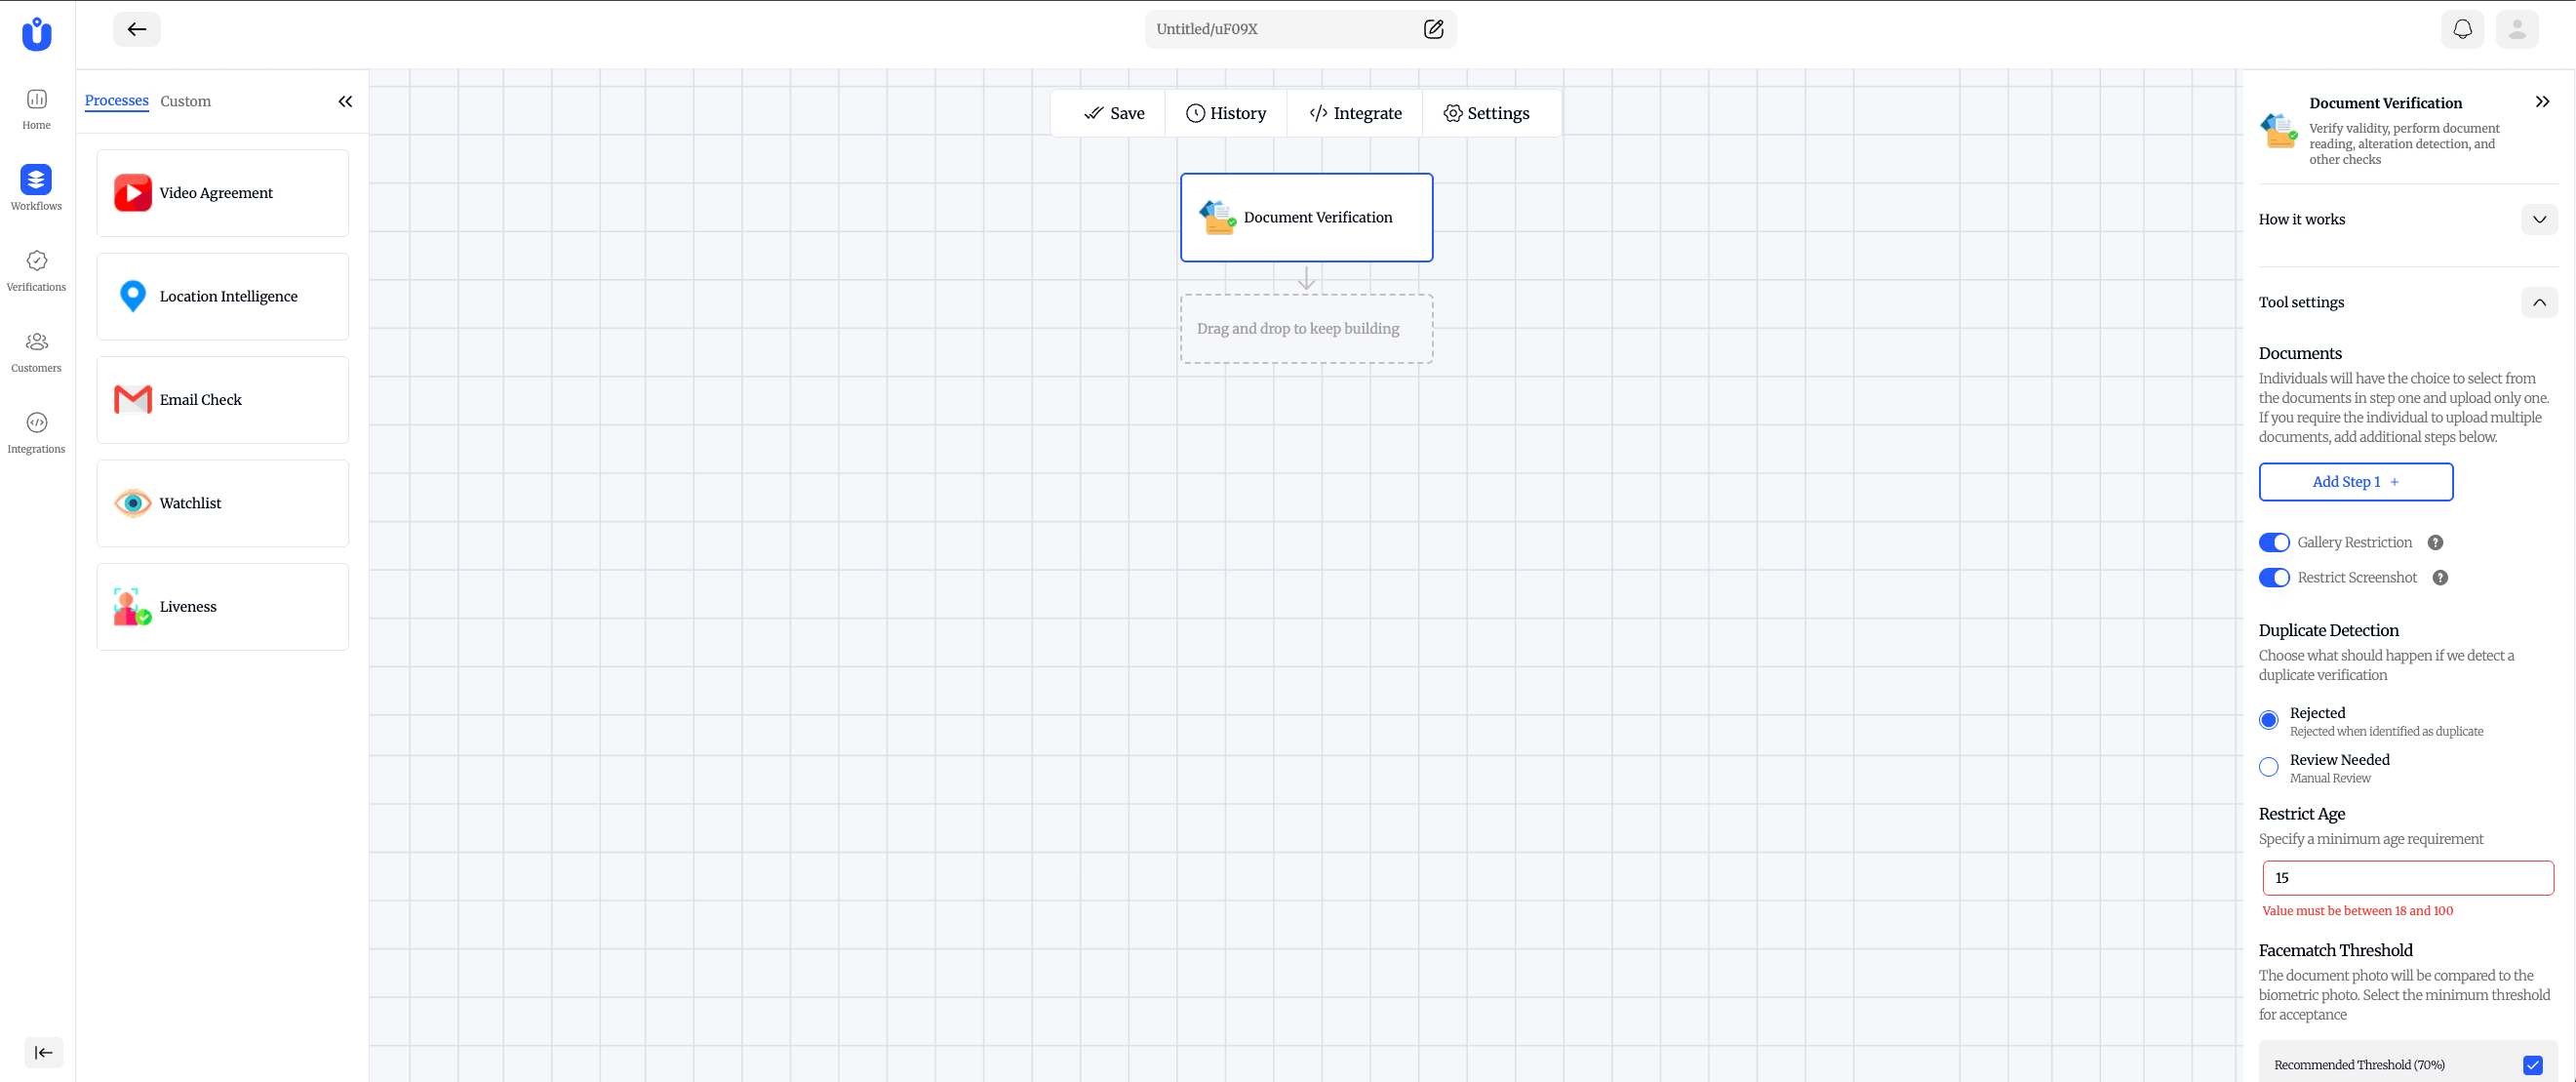
- Workflow ID: Create a verification workflow in your dashboard
Generate Your API Credentials
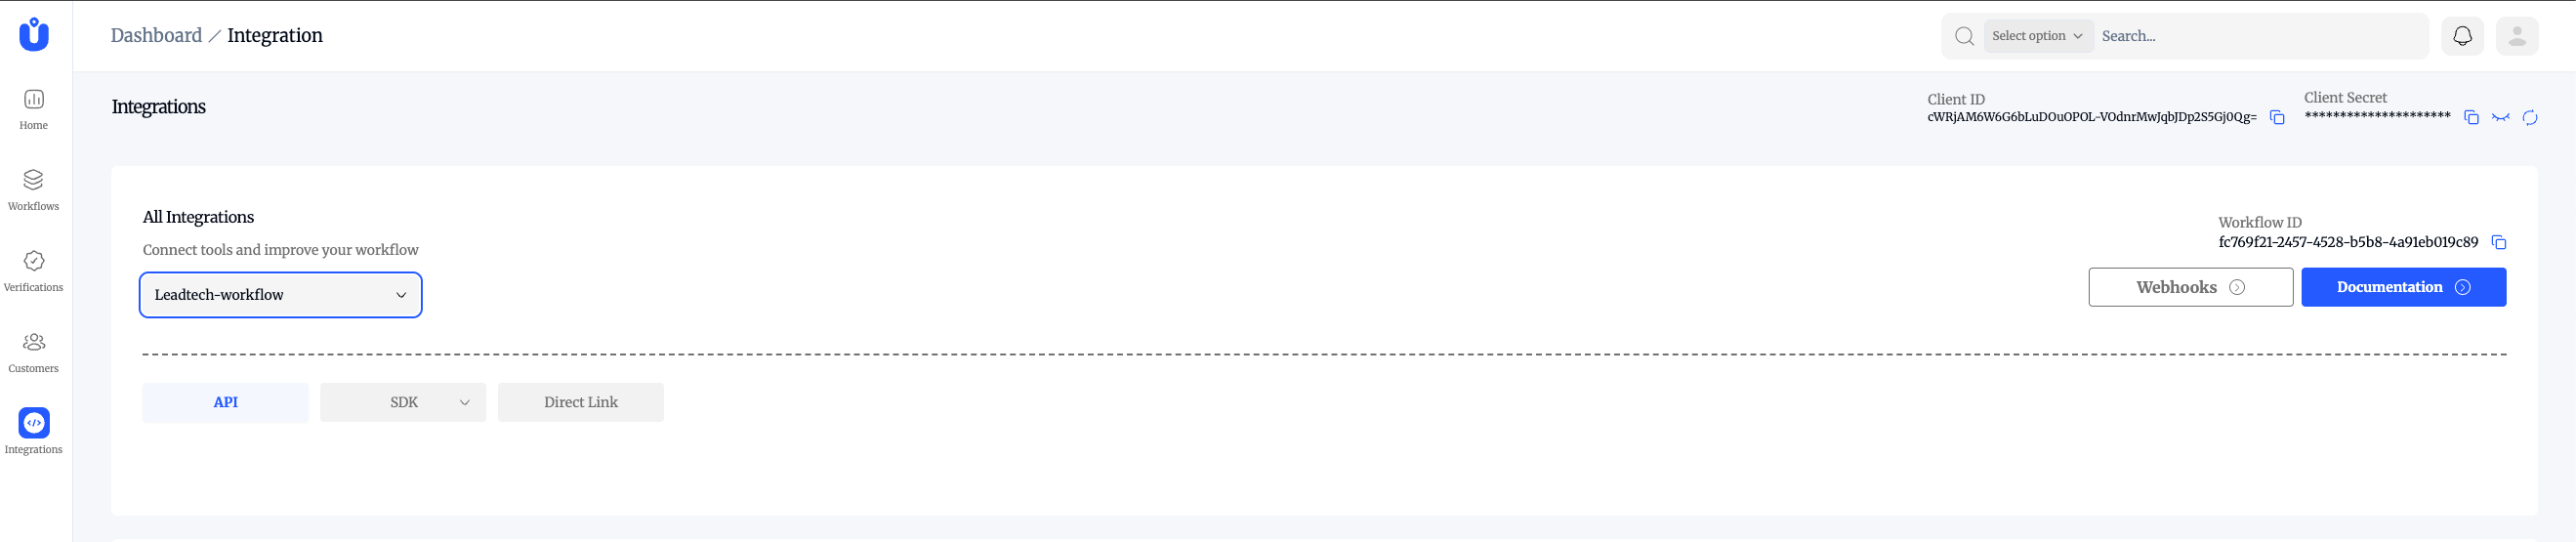
- Client ID: Your application identifier (sent via
X-CLIENT-IDheader) - Client Secret: Your authentication token (sent via
Authorization: Bearerheader)
Create a Workflow
Quick Start (5 minutes)
Step 1: Set Up Your Environment
First, set your API credentials as environment variables:export URTENTIC_API_KEY="your-base64-encoded-api-key"
export URTENTIC_CLIENT_ID="your-base64-encoded-client-id"
Step 2: Create Your First Verification
curl -X POST https://api.urtentic.com/api/v1/verifications \
-H "Authorization: Bearer $URTENTIC_API_KEY" \
-H "X-CLIENT-ID: $URTENTIC_CLIENT_ID" \
-H "Content-Type: application/json" \
-d '{
"flowId": "db50ed08-18fa-41e8-9e46-a44aca39f69d",
"metadata": {
"userId": "user_12345",
"applicationId": "app_67890"
}
}'
{
"id": "85c94e71-6e3f-4a19-b15c-781d8a876542",
"flowId": "db50ed08-18fa-41e8-9e46-a44aca39f69d",
"status": "pending",
"metadata": {
"userId": "user_12345",
"applicationId": "app_67890"
},
"createdAt": "2023-12-01T10:00:00Z",
"verificationUrl": "https://verify.urtentic.com?flowId=db50ed08-18fa-41e8-9e46-a44aca39f69d&clientId=YOUR_CLIENT_ID&metadata=%7B%22userId%22%3A%22user_12345%22%7D"
}
Step 3: Check Verification Status
curl -X GET https://api.urtentic.com/api/v1/verifications/85c94e71-6e3f-4a19-b15c-781d8a876542 \
-H "Authorization: Bearer $URTENTIC_API_KEY" \
-H "X-CLIENT-ID: $URTENTIC_CLIENT_ID"
Integration Examples
const URTENTIC_API_KEY = process.env.URTENTIC_API_KEY;
const URTENTIC_CLIENT_ID = process.env.URTENTIC_CLIENT_ID;
const BASE_URL = 'https://api.urtentic.com/api/v1';
// Create a verification
async function createVerification(flowId, metadata = {}) {
const response = await fetch(`${BASE_URL}/verifications`, {
method: 'POST',
headers: {
'Authorization': `Bearer ${URTENTIC_API_KEY}`,
'X-CLIENT-ID': URTENTIC_CLIENT_ID,
'Content-Type': 'application/json'
},
body: JSON.stringify({ flowId, metadata })
});
return await response.json();
}
// Check verification status
async function getVerificationStatus(verificationId) {
const response = await fetch(`${BASE_URL}/verifications/${verificationId}`, {
headers: {
'Authorization': `Bearer ${URTENTIC_API_KEY}`,
'X-CLIENT-ID': URTENTIC_CLIENT_ID
}
});
return await response.json();
}
// Usage
const verification = await createVerification('db50ed08-18fa-41e8-9e46-a44aca39f69d', { userId: 'user_12345' });
console.log('Verification URL:', verification.verificationUrl);
import requests
import os
URTENTIC_API_KEY = os.getenv('URTENTIC_API_KEY')
URTENTIC_CLIENT_ID = os.getenv('URTENTIC_CLIENT_ID')
BASE_URL = 'https://api.urtentic.com/api/v1'
def create_verification(flow_id, metadata=None):
if metadata is None:
metadata = {}
response = requests.post(
f'{BASE_URL}/verifications',
headers={
'Authorization': f'Bearer {URTENTIC_API_KEY}',
'X-CLIENT-ID': URTENTIC_CLIENT_ID,
'Content-Type': 'application/json'
},
json={ 'flowId': flow_id, 'metadata': metadata }
)
return response.json()
def get_verification_status(verification_id):
response = requests.get(
f'{BASE_URL}/verifications/{verification_id}',
headers={
'Authorization': f'Bearer {URTENTIC_API_KEY}',
'X-CLIENT-ID': URTENTIC_CLIENT_ID
}
)
return response.json()
# Usage
verification = create_verification('db50ed08-18fa-41e8-9e46-a44aca39f69d', { 'userId': 'user_12345' })
print(f"Verification URL: {verification['verificationUrl']}")
<?php
$apiKey = getenv('URTENTIC_API_KEY');
$clientId = getenv('URTENTIC_CLIENT_ID');
$baseUrl = 'https://api.urtentic.com/api/v1';
function createVerification($flowId, $metadata = []) {
global $apiKey, $clientId, $baseUrl;
$data = [ 'flowId' => $flowId, 'metadata' => $metadata ];
$context = stream_context_create([
'http' => [
'method' => 'POST',
'header' => [
"Authorization: Bearer $apiKey",
"X-CLIENT-ID: $clientId",
'Content-Type: application/json'
],
'content' => json_encode($data)
]
]);
$response = file_get_contents("$baseUrl/verifications", false, $context);
return json_decode($response, true);
}
$verification = createVerification('db50ed08-18fa-41e8-9e46-a44aca39f69d', [ 'userId' => 'user_12345' ]);
echo "Verification URL: " . $verification['verificationUrl'] . PHP_EOL;
?>
import com.fasterxml.jackson.databind.ObjectMapper;
import java.net.URI;
import java.net.http.HttpClient;
import java.net.http.HttpRequest;
import java.net.http.HttpResponse;
import java.util.Map;
public class UrtenticClient {
private static final String API_KEY = System.getenv("URTENTIC_API_KEY");
private static final String CLIENT_ID = System.getenv("URTENTIC_CLIENT_ID");
private static final String BASE_URL = "https://api.urtentic.com/api/v1";
private final HttpClient httpClient = HttpClient.newHttpClient();
private final ObjectMapper mapper = new ObjectMapper();
// Create a verification
public Map<?, ?> createVerification(String flowId, Map<String, Object> metadata) throws Exception {
Map<String, Object> body = Map.of("flowId", flowId, "metadata", metadata);
String json = mapper.writeValueAsString(body);
HttpRequest request = HttpRequest.newBuilder()
.uri(URI.create(BASE_URL + "/verifications"))
.header("Authorization", "Bearer " + API_KEY)
.header("X-CLIENT-ID", CLIENT_ID)
.header("Content-Type", "application/json")
.POST(HttpRequest.BodyPublishers.ofString(json))
.build();
HttpResponse<String> response = httpClient.send(request, HttpResponse.BodyHandlers.ofString());
return mapper.readValue(response.body(), Map.class);
}
// Check verification status
public Map<?, ?> getVerificationStatus(String verificationId) throws Exception {
HttpRequest request = HttpRequest.newBuilder()
.uri(URI.create(BASE_URL + "/verifications/" + verificationId))
.header("Authorization", "Bearer " + API_KEY)
.header("X-CLIENT-ID", CLIENT_ID)
.GET()
.build();
HttpResponse<String> response = httpClient.send(request, HttpResponse.BodyHandlers.ofString());
return mapper.readValue(response.body(), Map.class);
}
// Usage
public static void main(String[] args) throws Exception {
UrtenticClient client = new UrtenticClient();
Map<String, Object> metadata = Map.of("userId", "user_12345");
Map<?, ?> verification = client.createVerification("db50ed08-18fa-41e8-9e46-a44aca39f69d", metadata);
System.out.println("Verification URL: " + verification.get("verificationUrl"));
}
}
# Set your API credentials
export URTENTIC_API_KEY="your-base64-encoded-api-key"
export URTENTIC_CLIENT_ID="your-base64-encoded-client-id"
# Create a verification
curl -X POST https://api.urtentic.com/api/v1/verifications \
  -H "Authorization: Bearer $URTENTIC_API_KEY" \
  -H "X-CLIENT-ID: $URTENTIC_CLIENT_ID" \
  -H "Content-Type: application/json" \
  -d '{
    "flowId": "db50ed08-18fa-41e8-9e46-a44aca39f69d",
    "metadata": {
      "userId": "user_12345",
      "applicationId": "app_67890"
    }
  }'
# Check verification status
curl -X GET https://api.urtentic.com/api/v1/verifications/85c94e71-6e3f-4a19-b15c-781d8a876542 \
  -H "Authorization: Bearer $URTENTIC_API_KEY" \
  -H "X-CLIENT-ID: $URTENTIC_CLIENT_ID"
Workflow Types
Each workflow is configured in your Urtentic dashboard — the steps it includes (document verification, liveness, email, etc.) are defined there, not in the API request. TheflowId identifies which workflow to run, and metadata carries your own tracking data.
Document Verification Only
{
  "flowId": "db50ed08-18fa-41e8-9e46-a44aca39f69d",
  "metadata": {
    "userId": "user_12345"
  }
}
Liveness + Document Verification
{
  "flowId": "c3a2b1d0-5e4f-4a19-b15c-781d8a876542",
  "metadata": {
    "userId": "user_12345"
  }
}
Location + Email Verification
{
  "flowId": "f7e6d5c4-3b2a-4a19-b15c-781d8a876542",
  "metadata": {
    "userId": "user_12345"
  }
}
Handling Webhooks
Configure webhook endpoints in your dashboard to receive real-time updates:// Express.js webhook handler
app.post('/webhook/urtentic', express.raw({type: 'application/json'}), (req, res) => {
const signature = req.headers['x-urtentic-signature'];
const timestamp = req.headers['x-urtentic-timestamp'];
const payload = req.body;
try {
const currentTime = Math.floor(Date.now() / 1000);
if (Math.abs(currentTime - parseInt(timestamp)) > 300) {
return res.status(400).send('Webhook timestamp too old');
}
const secretBytes = Buffer.from(WEBHOOK_SECRET, 'base64');
const expectedSignature = crypto
.createHmac('sha256', secretBytes)
.update(payload)
.digest('hex');
let sig = signature.startsWith('sha256=') ? signature.substring(7) : signature;
if (sig !== expectedSignature) {
return res.status(400).send('Invalid signature');
}
} catch (error) {
return res.status(400).send('Signature verification failed');
}
const event = JSON.parse(payload);
switch (event.eventName) {
case 'verification_completed':
console.log('Verification completed:', event.flowId);
break;
case 'verification_abandoned':
console.log('Verification abandoned:', event.flowId);
break;
case 'step_completed':
console.log('Step completed:', event.flowId, 'Step:', event.id);
break;
}
res.status(200).send('OK');
});
from flask import Flask, request, jsonify
import hmac, hashlib, json, os, base64, time

app = Flask(__name__)
WEBHOOK_SECRET = os.getenv('WEBHOOK_SECRET')

@app.route('/webhook/urtentic', methods=['POST'])
def handle_webhook():
    signature = request.headers.get('x-urtentic-signature')
    timestamp = request.headers.get('x-urtentic-timestamp')
    payload = request.get_data()

    try:
        current_time = int(time.time())
        if abs(current_time - int(timestamp)) > 300:
            return jsonify({'error': 'Webhook timestamp too old'}), 400

        secret_bytes = base64.b64decode(WEBHOOK_SECRET)
        expected_signature = hmac.new(
            secret_bytes, payload, hashlib.sha256
        ).hexdigest()

        sig = signature[7:] if signature.startswith('sha256=') else signature
        if sig != expected_signature:
            return jsonify({'error': 'Invalid signature'}), 400
    except Exception:
        return jsonify({'error': 'Signature verification failed'}), 400

    event = json.loads(payload)

    if event['eventName'] == 'verification_completed':
        print(f"Verification completed: {event['flowId']}")
    elif event['eventName'] == 'step_completed':
        print(f"Step completed: {event['flowId']}")

    return jsonify({'status': 'ok'})
<?php
$webhookSecret = getenv('WEBHOOK_SECRET');
$payload = file_get_contents('php://input');
$signature = $_SERVER['HTTP_X_URTENTIC_SIGNATURE'] ?? '';
$timestamp = $_SERVER['HTTP_X_URTENTIC_TIMESTAMP'] ?? '';

try {
    $currentTime = time();
    if (abs($currentTime - intval($timestamp)) > 300) {
        http_response_code(400);
        echo json_encode(['error' => 'Webhook timestamp too old']);
        exit;
    }

    $secretBytes = base64_decode($webhookSecret);
    $expectedSignature = hash_hmac('sha256', $payload, $secretBytes);
    $sig = (strpos($signature, 'sha256=') === 0) ? substr($signature, 7) : $signature;

    if (!hash_equals($expectedSignature, $sig)) {
        http_response_code(400);
        echo json_encode(['error' => 'Invalid signature']);
        exit;
    }
} catch (Exception $e) {
    http_response_code(400);
    echo json_encode(['error' => 'Signature verification failed']);
    exit;
}

$event = json_decode($payload, true);
switch ($event['eventName']) {
    case 'verification_completed':
        error_log('Verification completed: ' . $event['flowId']);
        break;
    case 'step_completed':
        error_log('Step completed: ' . $event['flowId']);
        break;
}

http_response_code(200);
echo json_encode(['status' => 'ok']);
?>
import com.fasterxml.jackson.databind.ObjectMapper;
import com.sun.net.httpserver.HttpExchange;
import com.sun.net.httpserver.HttpHandler;
import javax.crypto.Mac;
import javax.crypto.spec.SecretKeySpec;
import java.io.InputStream;
import java.util.Base64;
import java.util.Map;

public class UrtenticWebhookHandler implements HttpHandler {
    private static final String WEBHOOK_SECRET = System.getenv("WEBHOOK_SECRET");
    private final ObjectMapper mapper = new ObjectMapper();

    @Override
    public void handle(HttpExchange exchange) throws IOException {
        String signature = exchange.getRequestHeaders().getFirst("x-urtentic-signature");
        String timestamp  = exchange.getRequestHeaders().getFirst("x-urtentic-timestamp");
        byte[] payload    = exchange.getRequestBody().readAllBytes();

        try {
            long currentTime = System.currentTimeMillis() / 1000;
            if (Math.abs(currentTime - Long.parseLong(timestamp)) > 300) {
                sendResponse(exchange, 400, "Webhook timestamp too old");
                return;
            }

            byte[] secretBytes = Base64.getDecoder().decode(WEBHOOK_SECRET);
            Mac mac = Mac.getInstance("HmacSHA256");
            mac.init(new SecretKeySpec(secretBytes, "HmacSHA256"));
            String expected = bytesToHex(mac.doFinal(payload));
            String incoming = signature.startsWith("sha256=") ? signature.substring(7) : signature;

            if (!expected.equals(incoming)) {
                sendResponse(exchange, 400, "Invalid signature");
                return;
            }
        } catch (Exception e) {
            sendResponse(exchange, 400, "Signature verification failed");
            return;
        }

        Map<?, ?> event = mapper.readValue(payload, Map.class);
        String eventName = (String) event.get("eventName");

        switch (eventName) {
            case "verification_completed" ->
                System.out.println("Verification completed: " + event.get("flowId"));
            case "verification_abandoned" ->
                System.out.println("Verification abandoned: " + event.get("flowId"));
            case "step_completed" ->
                System.out.println("Step completed: " + event.get("flowId") + " Step: " + event.get("id"));
        }

        sendResponse(exchange, 200, "OK");
    }

    private void sendResponse(HttpExchange exchange, int status, String body) throws IOException {
        byte[] bytes = body.getBytes();
        exchange.sendResponseHeaders(status, bytes.length);
        exchange.getResponseBody().write(bytes);
        exchange.getResponseBody().close();
    }

    private String bytesToHex(byte[] bytes) {
        StringBuilder sb = new StringBuilder();
        for (byte b : bytes) sb.append(String.format("%02x", b));
        return sb.toString();
    }
}
Error Handling
The API uses standard HTTP status codes and returns detailed error messages:async function handleApiCall() {
try {
const response = await fetch(`${BASE_URL}/verifications`, {
method: 'POST',
headers: {
'Authorization': `Bearer ${URTENTIC_API_KEY}`,
'X-CLIENT-ID': URTENTIC_CLIENT_ID,
'Content-Type': 'application/json'
},
body: JSON.stringify({ flowId: 'db50ed08-18fa-41e8-9e46-a44aca39f69d' })
});
if (!response.ok) {
const error = await response.json();
console.error('API Error:', error);
switch (response.status) {
case 400: console.log('Bad request - check your payload'); break;
case 401: console.log('Unauthorized - check your API credentials'); break;
case 429: console.log('Rate limited - wait before retrying'); break;
}
return null;
}
return await response.json();
} catch (error) {
console.error('Network error:', error);
return null;
}
}
import requests
from requests.exceptions import RequestException

def handle_api_call():
    try:
        response = requests.post(
            f'{BASE_URL}/verifications',
            headers={
                'Authorization': f'Bearer {URTENTIC_API_KEY}',
                'X-CLIENT-ID': URTENTIC_CLIENT_ID,
                'Content-Type': 'application/json'
            },
            json={'flowId': 'db50ed08-18fa-41e8-9e46-a44aca39f69d'}
        )
        if not response.ok:
            error_data = response.json()
            print(f'API Error: {error_data}')
            return None
        return response.json()
    except RequestException as e:
        print(f'Network error: {e}')
        return None
<?php
function handleApiCall() {
    global $apiKey, $clientId, $baseUrl;
    $data = ['flowId' => 'db50ed08-18fa-41e8-9e46-a44aca39f69d'];
    $context = stream_context_create([
        'http' => [
            'method' => 'POST',
            'header' => [
                "Authorization: Bearer $apiKey",
                "X-CLIENT-ID: $clientId",
                'Content-Type: application/json'
            ],
            'content' => json_encode($data),
            'ignore_errors' => true
        ]
    ]);
    $response = file_get_contents("$baseUrl/verifications", false, $context);
    if ($response === false) {
        error_log('Network error occurred');
        return null;
    }
    return json_decode($response, true);
}
?>
import com.fasterxml.jackson.databind.ObjectMapper;
import java.net.URI;
import java.net.http.HttpClient;
import java.net.http.HttpRequest;
import java.net.http.HttpResponse;
import java.util.Map;

public Map<?, ?> handleApiCall() {
    try {
        String json = mapper.writeValueAsString(
            Map.of("flowId", "db50ed08-18fa-41e8-9e46-a44aca39f69d")
        );

        HttpRequest request = HttpRequest.newBuilder()
            .uri(URI.create(BASE_URL + "/verifications"))
            .header("Authorization", "Bearer " + API_KEY)
            .header("X-CLIENT-ID", CLIENT_ID)
            .header("Content-Type", "application/json")
            .POST(HttpRequest.BodyPublishers.ofString(json))
            .build();

        HttpResponse<String> response = httpClient.send(request, HttpResponse.BodyHandlers.ofString());

        if (response.statusCode() >= 400) {
            System.err.println("API Error " + response.statusCode() + ": " + response.body());
            switch (response.statusCode()) {
                case 400 -> System.err.println("Bad request - check your payload");
                case 401 -> System.err.println("Unauthorized - check your API credentials");
                case 429 -> System.err.println("Rate limited - wait before retrying");
            }
            return null;
        }

        return mapper.readValue(response.body(), Map.class);
    } catch (Exception e) {
        System.err.println("Network error: " + e.getMessage());
        return null;
    }
}
Next Steps
- API Reference - Complete API documentation
- SDK Integration - Client-side SDKs
- Webhook Setup - Real-time notifications
Support
Need help? We’re here to assist:- Email: support@urtentic.com
- Documentation: docs.urtentic.com
- Status Page: status.urtentic.com